
How to Review and Approve Your Vetrina Shop Drawings
Once you receive your Vetrina shop drawings, take the time to review the complete drawing set before approving it for fabrication. Because Vetrina windows and doors are custom-manufactured for each project, the approved drawings become the primary reference for production.
Your review should confirm that the drawings accurately reflect both your order and the actual conditions at the project site.
Start With the Latest Revision
Before reviewing any details, make sure you are working from the most recent drawing revision.
Shop drawing packages may be updated as dimensions, configurations, finishes, hardware, or other project requirements are revised. Check the drawing date and revision information on the title block, and do not sign an earlier version if a newer revision has been issued.
Confirm the Project Information
Verify the basic project information first, including:
Project name
Project address
Customer or contractor information
Job number
Unit quantities
Drawing revision
This may seem straightforward, but confirming the project and drawing revision helps prevent an outdated or incorrect drawing set from being approved.
Verify Every Unit Against the Project
Each window or door should correspond to a specific opening, type, or position on the project.
Where the drawing package includes a window and door schedule, review the quantity, type designation, description, rough opening, and fabrication size for each unit.
A sample window and door schedule
A set of shop drawings for a typical Vetrina two-unit bi-fold project may include a schedule distinguishing the two door types, their quantities, stacking configurations, rough-opening dimensions, and fabrication dimensions.
On larger projects, use the position or unit number to match each shop drawing to its intended location.
Confirm the Rough-Opening Dimensions
Do not approve dimensions based only on architectural drawings or assumed framing dimensions.
Verify field conditions before fabrication whenever possible. Vetrina's installation guidance calls for measuring each opening at three widths and three heights, then using the smallest measured width and height to determine the available opening size.
When reviewing your shop drawings, compare the listed rough-opening dimensions with actual field measurements.
Remember that the rough opening and fabrication size are not supposed to be identical. Installation clearance is required around the manufactured frame.
Check the Overall Fabrication Size
Confirm the overall width and height of every unit.
Also review any dimensions that locate:
Mullions
Transoms
Meeting stiles
Individual panels
Operable sashes
Glass divisions
Thresholds or sills
For large doors and multi-panel systems, seemingly small dimensional changes can affect panel proportions, alignment with nearby architectural elements, and available clear opening.
Verify the Configuration
Do not review only the overall dimensions. Confirm that the product is actually configured the way you expect.
Check:
Number of panels or sashes
Fixed versus operable sections
Mullion and transom locations
Panel divisions
Door leaves
Active and passive panels
Any special configuration requirements
Verify sash configuration, hinge or pivot locations, and operating type against the approved shop drawings.
Confirm Opening and Stacking Direction
Opening direction is especially important for swing doors, sliders, and bi-fold systems.
Verify:
Which direction the product opens
Which side is hinged
Which panel is active
Which direction a slider moves
Which direction a bi-fold system stacks
Whether the system opens inward or outward
Consider the surrounding space as well. Make sure the proposed operation will not interfere with walls, furniture, railings, columns, cabinetry, walkways, or other building elements.
Check Interior and Exterior Orientation
Always identify which side of the drawing represents the interior and which represents the exterior.
Orientation can affect:
Handing
Handle location
Locking hardware
Hinge location
Panel stacking
Drainage
Sill and threshold configuration
Vetrina requires verification of interior/exterior orientation, handing, head and sill orientation, and drainage locations against the approved drawings.
Do not assume that a drawing is being viewed from the interior unless it is clearly labeled that way.
Verify Frame Color and Finish
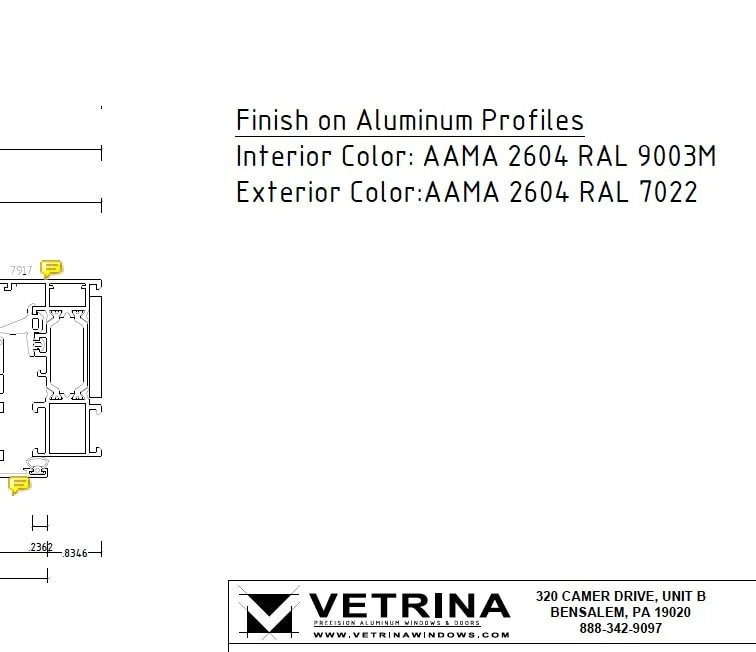
Check all specified finishes before approval.
Depending on the project, the shop drawings may identify:
Anodized finish
Powder-coated finish
RAL color
Interior and exterior colors
Dual-color configuration
uPVC foil or laminate finish
If your project uses different interior and exterior colors, make sure both are shown correctly.
Review the Glass Specification
Where glass is included, confirm that the glass makeup matches the project requirements.
Depending on the product, the drawing may identify:
Overall IGU thickness
Individual glass lite thicknesses
Tempered glass
Laminated glass
Low-E coating
Air or gas spaces
Special glazing requirements
Shop drawings usually include a dedicated glass specification showing the overall insulating glass thickness and individual glass components.
If you are unsure how to interpret a glass specification, contact Vetrina before approving the drawings.
Review the Hardware
Verify the hardware shown for each applicable unit, including:
Handles
Locks
Cylinders
Keyed or non-keyed configurations
Hinges
Specialty hardware
Some projects may have multiple hardware options. Review hardware with the unit orientation and operation because the location can depend on which panel is active and how the product opens.
Review Threshold and Sill Conditions
Pay particular attention to door thresholds and window sill conditions.
Different systems may use:
Standard thresholds
Low thresholds
Recessed thresholds
Flush conditions
Project-specific sill details
Section drawings can help show how the frame and threshold relate to the adjacent construction. These details should be coordinated with finished floor elevations, waterproofing, exterior paving, and other surrounding construction before fabrication.
Compare the Drawings With Actual Field Conditions
Shop drawings define the unit Vetrina will manufacture, but they do not replace field verification. Before approval, confirm that the actual construction can accommodate the product shown. Verify all dimensions and field conditions at the installation location, and avoid assuming that a typical detail applies to every opening. This is especially important when openings are already framed or constructed.
What If You Find Something That Needs to Change?
Do not sign the drawings for fabrication.
Clearly identify the requested change and return the drawing set to Vetrina. Depending on the revision, our team may issue an updated drawing package for another review.
When a revised set is returned, review the entire affected drawing again rather than checking only the individual item that was changed.
Approving the Drawings
Once you have confirmed that the dimensions, configuration, finishes, glass, hardware, orientation, operation, and other project-specific information are correct, sign the drawings where indicated and return the approved set to Vetrina.
Approval tells our team that the project-specific information shown on the drawings has been reviewed and can be used as the basis for fabrication.
For custom windows and doors, changes requested after approval may affect material requirements, fabrication, pricing, and project lead time.
Keep the Approved Drawings for Installation
Keep the approved shop drawings available to the project team after fabrication begins.
Installers can use them to confirm each unit goes into the correct opening and that its size, configuration, handing, and orientation match the project requirements. Vetrina also recommends checking delivered units against the approved measurement or shop-drawing documentation.
Need Help Before Approving?
If anything on your shop drawings is unclear, contact Vetrina before signing them for fabrication.
When contacting us, please provide your project name or job number, drawing page number, and unit or position number, along with a clear description of your question. Marking the area directly on the drawing is also helpful.
It is always better to resolve a question during the shop-drawing stage than after a custom unit has entered production.